During the project I’m working to create architectural visualization in Unreal Engine 4, I came up with some ideas to improve workflow when creating objects in blender for export to Unreal Engine 4.
So I started to create this addon
Now it is time to release it to the public (Free!), So I hope the addon will help more people like it helps me now!
If you download it, please note that I’m 3d artist. You could send reports of problems suggestions etc … but I can not promise anything. Remember I am not a professional coder
DOCUMENTATION:
<strong>Installation</strong>
To install the addon, in blender go to File > User Preferences and then you can use the Install Add-On button in the header of the Add-Ons window. Simply click the button and locate the zip file UE4Tools1_2.zip on you computer. Once installed, the script will show up in the panel. If you have a previous version , uninstall and remove the previous version before install the new version.
This is the main panel , you will find the tools under the newly created tab called “UE4 Tools”
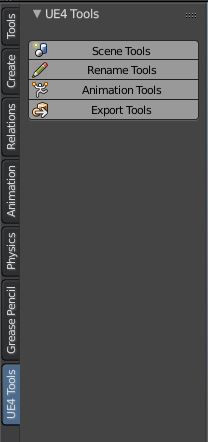
If you Want to change the panel and put the tools in the tools tab, yo must edit a couple lines on the script “ue_tools_v1-2.py”.This is how looks by default:
class Mainpanel(bpy.types.Panel):
"""A Custom Panel in the Viewport Toolbar"""
class Mainpanel(bpy.types.Panel):
"""A Custom Panel in the Viewport Toolbar"""
bl_label = "UE Tools"
bl_space_type = 'VIEW_3D'
bl_region_type = 'TOOLS'
#bl_category = 'Tools'
bl_category = 'UE Tools'
Firt remove the “#” symbol at line 1257 on “#bl_category = ‘Tools'” , and then put the symbol on line 1258 on “bl_category = ‘UE Tools'”.You shoul see it like that:
class Mainpanel(bpy.types.Panel):
"""A Custom Panel in the Viewport Toolbar"""
bl_label = "UE Tools"
bl_space_type = 'VIEW_3D'
bl_region_type = 'TOOLS'
bl_category = 'Tools'
#bl_category = 'UE Tools'
<strong>Scene tools</strong>
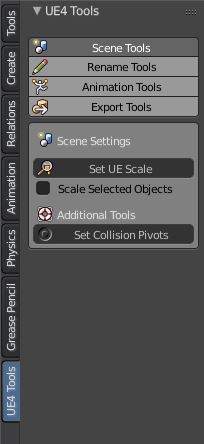
With Scene Tools, you can easily set the scale of the scene and objects and the pivot points for the collision meshes.
- Set UE Scale: If you press this button, The scene will change to be in centimeters with all necessary parameters configured to not have problems with the camera.
- Scale Selected Objects: If you have this box checked, by pressing the “Set UE Scale” button, the Scale will be configured correctly also for the selected objects.
- Set Collision Pivots: By pressing this button, is posible to set up the pivot point for multiple collision meshes in 1 click.
What are collision meshes and how work the “Set collisions Pivot” Button I recommend take a quick look on the Unreal Engine documentation. As you can see, collision meshes must have a specific name
So we can see that, by rename the collision meshes with the corresponding Prefix (UCX) and suffix (in case of multiple meshes), you will assign the collisions to a particular object.
If in your scene you have some collision meshes assigned to some objects, just by selecting the objects and pressing the “Set Collision Pivots” the addon will set up all pivot points on the collision meshes, according to the object to which they are assigned
<strong>Rename tools</strong>
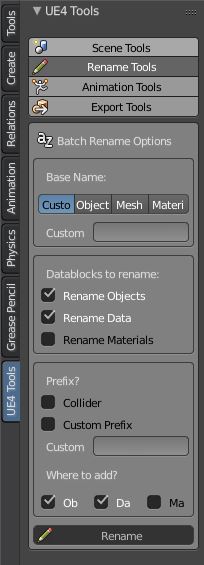
The Rename tools, were included especially, for rename multiple collision meshes in a batch operation. These operations are based in an old blender addon called “Batch Rename Datablocks” which still works. I adapted the tools for use it on the tools shelf and I included some options to rename objects collision easily. This Panel consists of 3 different sections:
- Base name: Here you can choose the basis for the name that will be used for rename, You have several options. Use a custom name (this option is used to rename objects collision), use the name of the selected objects, use the object data name of the selected objects, or use the name of the first material (this last option is not used but as the code base that I utilize include this option, I have also decided to include in this addon.
- Data blocks to rename: In this section, you can choose in what type of data you want to rename. The options are: The name of the object, the object data name, or the name of the first material
- Prefix: In this section you can define a prefix to add to the base name, when you rename the objects. If you check the “Collider” box, automatically the “UCX_” prefix will be added, plus a numeric suffix supported in Unreal engine (Blender adds suffixes in this format .000, .001 etc. .. Unreal Engine need in that other _000 , _001, to detect collision objects). You can also check the “Custom Prefix” box if you want to add a custom prefix. In this case, no suffix is added. And finally, you can choose in which data type the prefix will be added.
<strong>Animation tools</strong>
Object Mode
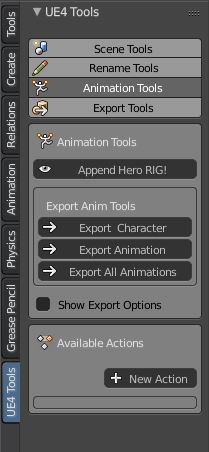
The tools of animation were created basically with 2 purposes. First, export only the bones that deform some vertex of geometry (this provides the ability to add extra bone to create a RIG for the animation) and secondly, rapidly have a “standard” skeleton compatible? with animations provided by Epic in some of their templates
- Append Hero RIG!: This button will append the Hero RIG and will ask you for a name for the character, also will ask if you want append the mannequin mesh (the blue guy) and the mesh resolution( high resolution or mobile optimized). The rig and the mesh are in centimeters but you can change it if you want , just open the addon zip file and extract the blend file ( the template), change the scale how you want and save the file. then replace the template on the zip file with your new scaled blend file and before reinstall the addon , make sure you uninstall the previous version. On the template, please not change the name of the template or the names of any object or armature in the scene , this will cause an error
- Export camera Animation: When a camera is selected on this panel will apear a button for export the camera animation, if “show export Options” is checked more options like the forward and Up axis (maybe you musty play with that), custom name etc.. will show up
- Export Character: For use this feature you must select the mesh/meshes and then your armature so the armature will be the active object. When is pressed will export the character mesh and the armature , but only will export the bones that are defined as a “DeformBones”. On the animation tools video you can see how to do it with the addon tools and below you will find more info.
- Export Animation: This button will export the animation and only the bones on “DdeformBones” group will be exported. You only need select the RIG and press the button. The animation exported, will be the current active action on the armature and the addon will set up the last frame according to the last frame of the action
- Export All Animations: When this button is pressed, the addon will check on for the actions on you blend file and every Fake action found will be exported. You must select an armature for use this feature and have some limitations…if you have actions for more than 1 character will export all fake actions anyway, so I recommend use this feature only if you have fake actions for 1 character. Another thing to take into account using this feature is pay attention and keyframe the rig setting you want to use (IK or FK etc..) for each action/animation on the first frame
- Show Export Options: If you Enable this check Box you will see some custom settings for the FBX like the Scale , the Axes , the name for the FBX and the destination folder
- Available Actions: This panel is for create and remove actions, is visible also in pose mode. When you press the button for create a new action , a pop up will ask for a name of the action, will set up the new action to active action and set the user to Fake user. when new action is created , a new button appear on the actions panel with the name of the action , press the action button at any moment for change the active action. Also you will see a button for remove the action.
Pose mode
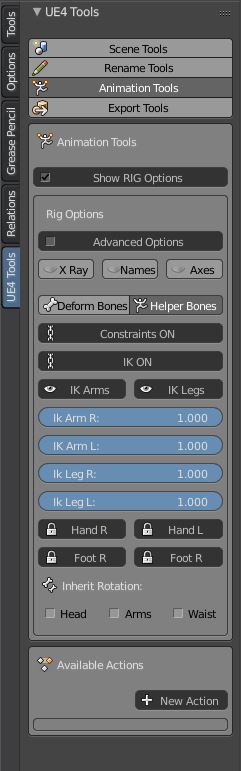
In pose mode , only if you have selected an Hero Rig you will see the RIG options panel. From this panel you can animate all the options for the rig , like the use of Ik/FK. Any changes to these settings remain stored in the blender file for the next time you open the file
- Show Rig Options!: Self explanatory , toggle between show the options or not
- Advanced Options: Toggling this will show more options? for animate the hands/foots? lock and inherit rotations
- Xray: This option will show the armature through the mesh
- Names: This option will show the name of the bones
- Axes: this option will show the axes of the bone
- Deform Bones: Will show only the layer for Deform Bones
- Helper Bones: this option will show the Bones for animate the character
- Constraints ON/OF: This option will toggle between use the constraints or not. If you want load a bvh file turn OFF
- IK On/OFF: This option will toggle between use the IK or not. If you want load a bvh file turn OFF
- IK Arms: If you use IK then you can choose if use Ik on the arms or not
- IK Legs: If you use IK then you can choose if use Ik on the Legs or not
- Sliders in general: With this sliders you can animate the influence some options on the Rig
- Hands/Foot Lock: Lock the hand and foots to the IK contorls
- Inherit Rotation: If the boxes are unchecked the bones will not follow the rotation of their parent
Object Mode
(Rig not ready)
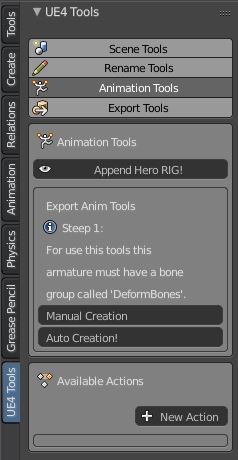
The addon use a bone group called “DeformBones” for know what bones to export If your armature not have a bone group called “DeformBones” the tools in object mode not appear , instead you will see a message, inform you to that fact.The addon have 2 options for create this group, manually and automatically:
- Manual Creation: When Manual Creation is pressed, the context change to pose mode , so you will be ready to select the bones you want to export. When you have all the bones selected just press the button “Set deform bones” and the group DeformBones will be created with all the bones you choose
- Auto Creation: This option will create the group and will scan all the bones to see the bones that deform the geometry, if some does, will add the bone to the group.
<strong>Export tools</strong>
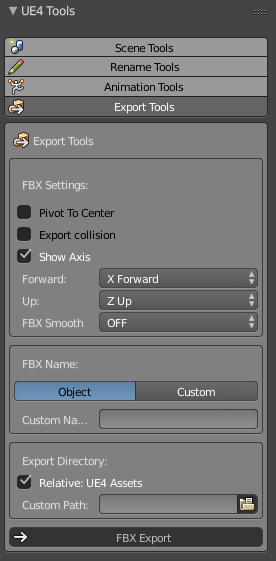
This is the most important part of addon (in my opinion) and greatly simplifies the process of exporting to FBX objects therefore, substantially improves workflow.This panel is basically for export static meshes with collision meshes along and you may configure some additional parameters basically the same options that appear when you manually export to FBX, but I deleted some functions that will be applied by default to export. such as applying modifiers. In “FBX Name:” you can set the name for the exported file. if you select “Object” on the panel, the export file will have the name of the active object in the scene, if you select “Custom” must specify a custom name for the export of FBX file in the “Export directory” section you may specify the directory where to export the FBX files. By default the “Relative EU Assets” box appear checked, meaning that a folder will be created in the directory where the blende file is stored,? called “UE Assets” and the FBX files will be exported to that folderWhen You choose “Static” , you will see some extra options “Pivot to Center” and “Export Collision”
- Pivot To Center: This option is very useful. Allows multiple objects in the same layer, and you can select multiple objects at once and will be exported individually in separate files, with the pivot point properly in place. With this option enabled, you don’t need? to have the object for export at the center of the scene and you will be able to export multiple objects at once
- Export Collision: Self Explanatory. If you have some collision meshes assigned to the objects selected when you hit the export button, will be exported the collision meshes along the selected objects.
Pressing the button “FBX Export”, at the end of the panel, the selected objects will be exported
<strong>Release notes</strong>
UPDATE: (07/15/2015)
Blender 2.75 is out and have some changes for the fbx export so i update the addon to meet the new API. Also I made a couple changes
- Removed all options related with ASCII 6100, now all exports wikll be in BIN format
- New Export Panel ( only for static meshes)
- Updated the mannequin
- Added a button for export camera Animation
UPDATE: (04/20/2015)
- Fix for re-init the addon itself, every time open a new fiel in the same session
UPDATE: (04/01/2015)
Blender 2.74 is out and have some changes for the fbx export so i update the addon to meet the new API. Also I made a couple changes
- In this update I remove the check box for export with or without smoothing shading,The new blender version export take into the account the normals of the faces by default , so is fine , if you have flat shading in some faces and smooth in others , will export correctly.
- The new Blender version also have an option for bake the animation in all bones, this is good because avoid a big problem with the locations of the bones, I show this problem on the animation tools video some days ago and how I deal with that but we don’t need to do anymore.
- Also I made a change on the workflow for export animations and characters. I remove the pop ups asking for rotate 180 because I found I don’t need anymore. I append the Hero (so facing -y) and I just press export character and the same for the animations. I do some test with the hero and with MakeHuman rigs and work fine. If you find you need rotate 180 the character for some reason let me know , the code is on the addon , just commented, so ignored.
UPDATE: (03/11/2015)
During the viewing of some TeslaDev streams, I needed to create an animation for the blue guy and complete the prototype as I wanted. That led to some new features for the addon .
Basically At first it was for quickly have a friendly skeleton for animation and compatible with animations that comes standard with the Unreal engine (the hero/blue guy), but in the end I thought it would be useful that these tools serve me for another kind of Rigs, especially those who I could create in the future, if I need something specific.
These features do not add any new functionality to blender… But simplify some things , at least for me. I hope that help you
BTW: I changed the name of the addon, now UE4 tools, a clearer name
<strong>Version History</strong>
You can Download the addon by pressing this download button. And if you wish, you can also make a donation so can help me to continue releasing more free content, or improve the addon
GNU GENERAL PUBLIC LICENSE 
[paypal-donation purpose=”UE4tools Donation” reference=”UE4tools”]